Welcome back for Part 6 of this System Center VMM series, in this post I will talk to you about the Library server.
When setting up VMM you will get asked about adding a Library server if it’s a standalone setup, if it’s a Clustered VMM solution you will need to add the library server after you have finished installing VMM
Building a good folder structure for your library server is an important thing. Try to create separate shares for your library folders based on what they are.

My main 4 is, Administration, Drivers, Iso and VHDs folders. This keeps it simple but easy to find what you need.
Adding a Library server is simple, right click the library server under fabric

It’s as simple as choosing a credential, selecting a server, choosing the shares and voila you have a library server.
Adding a Library Server with Powershell is just as easy.
#Variables
$LibraryServer = "Fileserver1"
$LibraryRunAsAccountName = "VMM Admin"
$libraryCredentials = Get-SCRunAsAccount -Name $LibraryRunAsAccountName
$AdministrationLibraryPath = \fileserver01\Administration
$DriversLibraryPath = \fileserver01\Drivers
$ISOsLibraryPath = \fileserver01\Isos
$VHDsLibraryPath = \fileserver01\Vhds

#Adding Library Server
Add-SCLibraryServer -ComputerName $LibraryServer -Credential $libraryCredentials

#Adding Library Shares
Add-SCLibraryShare -SharePath $AdministrationLibraryPath
Add-SCLibraryShare -SharePath $DriversLibraryPath
Add-SCLibraryShare -SharePath $ISOsLibraryPath
Add-SCLibraryShare -SharePath $VHDsLibraryPath
If you have multiple Datacenters you can add more then 1 library server, and define that library server to that datacenter.
To do so go to the library pane, right click your Library server and click on properties. And under Host Group on the main page click the Host Group it’s located in.

This will allow you to specify that any resources accessing a file that is in any Library server will come from the closest Library server.
You will also need to define VMNetworks belonging to that Library Server. You will do so under Properties and VM Networks. Choose the VM Networks for this site.

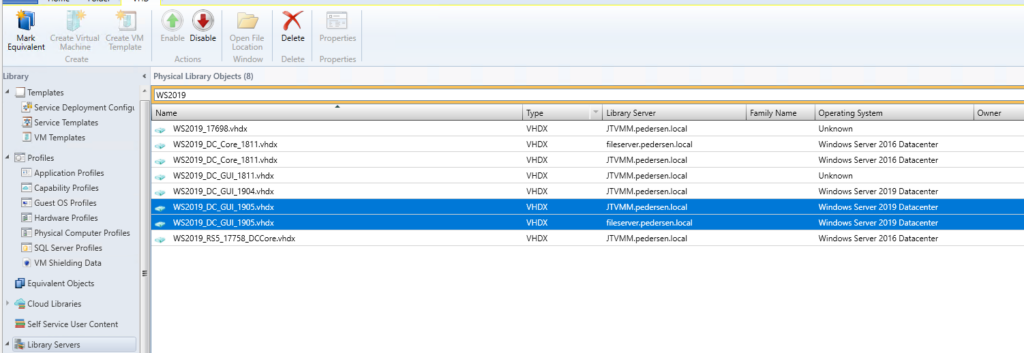
Now to get VMM to give you the correct file from the correct Library Server you need to set Equivalent Objects. To do this locate a file, for instance a vhdx file by searching in the Library Servers.

Choose the 2 files and click on the top right icon Mark Equivalent. And fill in some information.

Now you can see the files under the Equivalant Objects folder. Repeat for other objects yyou wan’t to “share” between datacenters.

Now if this VHDX file is in a template it will deployed from the Library Server that is in the same Host Group as where you are deploying the virtual machine.
At the moment VMM does not support DFS NameSpace shares. But DFSR will work as replication between the fileservers. Another option is to use RoboCopy as a scheduled task to mirror the pri fileserver.
How to configure System Center VMM Part 1 – Basic Design
How to configure System Center VMM Part 2 – Host Groups
How to configure System Center VMM Part 3 – Logical Network
How to configure System Center VMM Part 4 – Port Profiles
How to configure System Center VMM Part 5 – Logical Switches
How to configure System Center VMM Part 6 – Library Server
How to configure System Center VMM Part 7 – Run As Accounts
How to configure System Center VMM Part 8 – Deployment Server
How to configure System Center VMM Part 9 – Driver Tagging
How to configure System Center VMM Part 10 – Physical Computer Profiles
How to configure System Center VMM Part 11 – Bare Metal Deployment
How to configure System Center VMM Part 12 – Update Server and Baselines
How to configure System Center VMM Part 13 – Patching Hosts
How to configure System Center VMM Part 14 – Hardware Profiles
How to configure System Center VMM Part 15 – Guest OS Profiles
How to configure System Center VMM Part 16 – VM Templates
How to configure System Center VMM Part 17 – Clouds