In this guide i will give you a quick overview on how to troubleshoot your Storage Spaces, like ordinary Storage Pools with and without Tiering and Storage Spaces Direct. I will do the troubleshooting based on an issue we had with our test Storage Spaces Direct Cluster.
What happen was that we where starting to experience really bad performance on the VM’s. Response times where going trough the roof. We had response times of 8000 ms on normal os operations. What we traced it down to was faulty SSD drives. These where Kingston V310 consumer SSD drives. These did not have power loss protection on them, and that’s a problem as S2D or windows storage want’s to write to a safe place. The caching on these Kingston drives worked for a while. But after to much writing it failed. You can read all about SSD and power loss protection here.
So what i will cover here is how to identify slow disks.
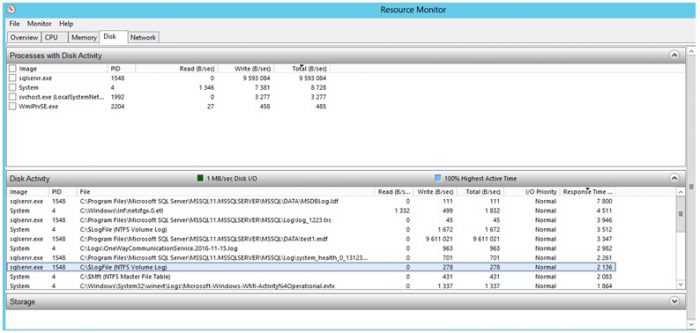
First you will notice performance issues on your VM’s or physical server. Open resource monitor and look at Response times
First rule out RDMA if this is for a Scale-Out-Fileserver or S2D
Download this powershell script and run it on your server.
https://github.com/Microsoft/diskspd/blob/master/Frameworks/VMFleet/test-clusterhealth.ps1
You should get an output like this, and look for the SMB Connectivity Error Check. Look at errors the last 5 min and run the test a few times and look for if the numbers increase. As this is an indication for RDMA problems.
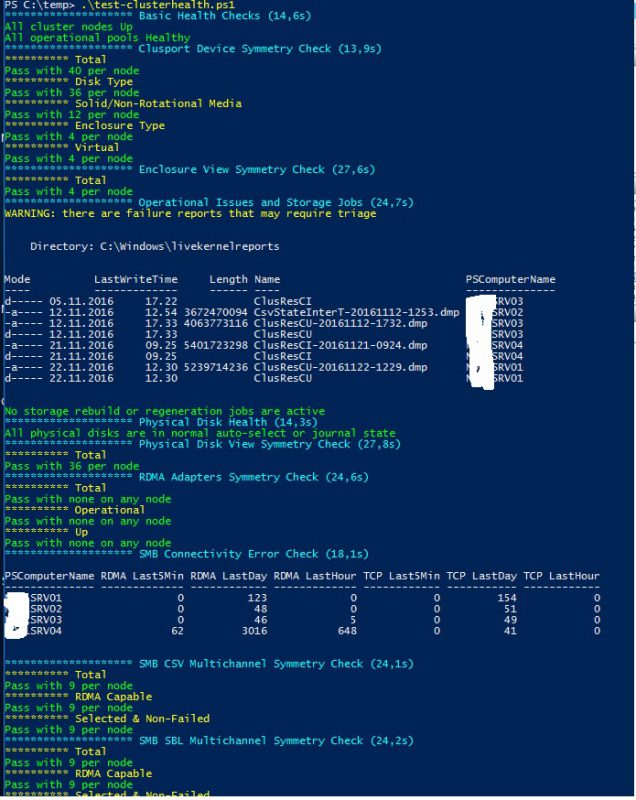
As you can see there where some issues on RDMA here, but nothing serious. The nr 4 node is being looked after. I will come back with a guide for that.
Now let’s have look at the disks on the physical machine.
If you have S2D you should see if all drives in the storagepool is attached to the Caching device. I have NVME as caching device and ssd and hdd as performance and capacity. The caching device will be the :0 and the disks will be 1:0 2:0 and so on depending on how many drives you have.
So what you do is run this command.
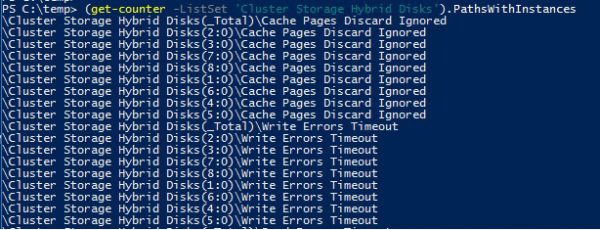
(get-counter -ListSet 'Cluster Storage Hybrid Disks').PathsWithInstances
And you will get this list. It’s pretty long. I have 6 HDD and 2 SSD totaling 8 drives. And all 8 is attached to the Caching device. This is important.
Now let’s jump to performance counter and add a counter there.
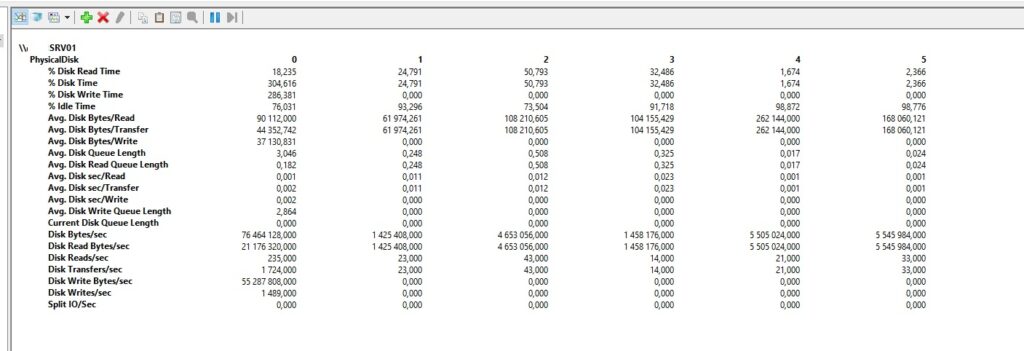
Now to know which disk is SSD and wich is HDD you will need to run this next command. Disk 0 is the caching device.
gwmi -Namespace root\\wmi ClusPortDeviceInformation | sort ConnectedNode,ConnectedNodeDeviceNumber,ProductId | ft ConnectedNode,ConnectedNodeDeviceNumber,ProductId
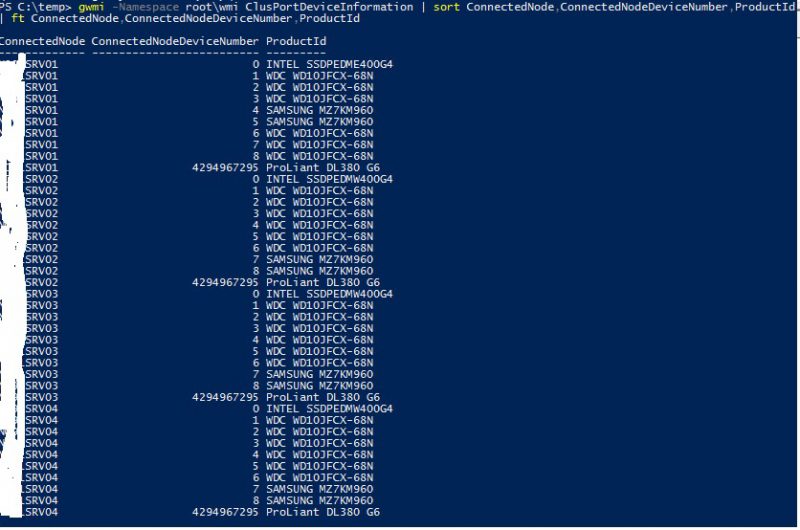
For a singel node the command is
Now we can go back to Perf monitor. We can see on node 1 that the SSD’s are disk 4 and 5. In the screenshot i have here the SSD’s where 1 and 2
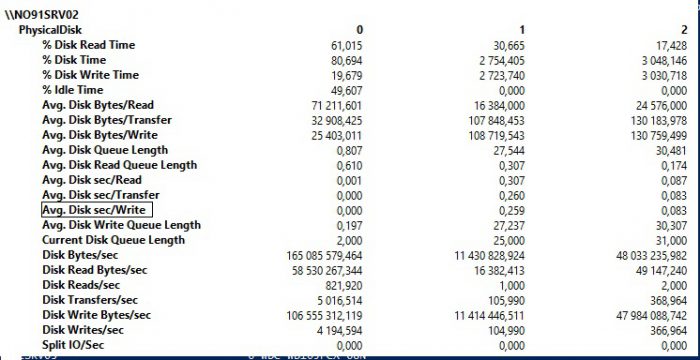
If you look closely at the Avg. Disk sec/Read, Avg. Disk sec/Transfer and Avg. Disk sec/Write you will see high numbers. They should be in the 0,001-0,003 or as low as possible. We did see numbers in the range of 1,870. And not this is Average numbers not max, so you can imagine the high latency on this. This was caused by Windows Server telling the storage disk to write to a safe place. And when the SSD caching is not working on the SSD the safe place is directly on the Nand cells, wich has about 200 iops. The ssd should do 25k iops in writing.
To replace failed drives in a storage pool i used this guide. I will paste it in here for reference.
# Find the failed Disk
Get-PhysicalDisk

# Shutdown, take the disk out and reboot. Set the missing disk to a variable
$missingDisk = Get-PhysicalDisk | Where-Object { $_.OperationalStatus -eq 'Lost Communication' }

# Retire the missing disk
$missingDisk | Set-PhysicalDisk -Usage Retired

# Find the name of your new disk
Get-PhysicalDisk

# Set the replacement disk object to a variable
$replacementDisk = Get-PhysicalDisk –FriendlyName PhysicalDisk1

# Add replacement Disk to the Storage Pool
Add-PhysicalDisk –PhysicalDisks $replacementDisk –StoragePoolFriendlyName pool

# Repair each Volume
Repair-VirtualDisk –FriendlyName <VolumeName>

# Get the status of the rebuilds
Get-StorageJob

# Remove failed Virtual Disks
Remove-VirtualDisk –FriendlyName <FriendlyName>

# Remove the failed Physical Disk from the pool
Remove-PhysicalDisk –PhysicalDisks $missingDisk –StoragePoolFriendlyName pool
6 thoughts on “Troubleshooting performance issues on your windows storage. Storage Spaces Direct”
Hi,
We have come across exactly the same situation (were using Intel 520 SSD’s without power protection). Have swapped the SSD’s out with Intel Data Centre models (which DO have power protection) however we are not seeing any difference…. The counters are not increasing even with heavy write operations.
Once you swapped your SSD’s out did you need to do anything else? E.g. reboot the nodes, repair the CSV’s?
Thanks,
Steve
Hello Steve, how are your virtual disks. You did swap 1 and 1 disk and let it rebuild? Can you run a optimize-storagepool to rebalance disks. You could check out, show-prettypool.ps1 script from Cosmos Darwin this will show you the balance of the disks.
Also give me a picture of your perfmon and physical disks when you have load on it.
Plus a output of
get-virtualdisk
get-physicaldisk
get-storagejob
JT
Thanks for the reply.
In the end we discovered that S2D was not working with SES and as such the HDD’s weren’t even in the enclosure – just the SSD’s! Change of HDD’s got two enclosures with the SSD’s and HDD’s as expected and all working fine now.
Our own fault for not using qualified hardware!
Thanks – Steve